The Music player
So, the music player looks like this (click it for a larger image):

What you can see is:
- The large tabbed window pane, the genre pane, on the left. It has a tab for each genre and all of the albums for that genre are shown in the pane.
-
To the right of this there are three window panes:
- At the top a clock - just because it's handy
- To the right of this is the album cover
 .
.
- Below these is the tracks pane which is described below.
- At the bottom of the window is the control panel and status bar.
The Tracks pane
The Tracks pane has four tabs. The pane for each tab has its own colour to help you distinguish them:
- Playing Now (blue): this shows the tracks of the album which you have selected in the genre pane. When an album is playing the current track is highlighted.
- All tracks (green): this shows all of the tracks in all of the albums in this genre. When this pane is selected and you press play then you hear all of the tracks for this genre.
- Playlist (cyan aka Aqua):.
- Preview (grey): if you are playing something and you want to have a look at the tracks in a different album then clicking that album will focus-in on the preview pane with that album's details on show.
Playlists
When you click the Playlist tab a menu bar will be revealed at the top of the tracks pane: this has six menu options:
- New playlist: when you select this the control panel at the bottom of the window changes from a Play control panel to a Playlist control panel and you are given an empty pane to create/edit your playlist. See the Playlist control panel below.
- Open playlist: when you select this you get an open dialog listing all of the playlists which you have already created. Select the one you require and open it.
- Save playlist: when you select this the response depends on the situation: on one hand you could have a newly created playlist which has not been saved yet or, on the other hand, a playlist which you have loaded from the playlist folder or one which you have just created and saved already. In other words it depends whether or not it is a playlist which which has already been named.
If this is a newly created playlist which has not been saved yet then you get a save dialog which lists all of the playlists which you have already created. Type the name which you want to give your new playlist in the File name: box and click the Save button. Warning if you select an existing playlist it will be overwritten by the new one although you will be asked if this is what you want to do.
If is a named playlist which you might have edited then the copy in the playlist folder will simply be updated with the current version.
- Edit playlist: when you select this the control panel at the bottom of the window changes from a Play control panel to a Playlist control panel and if you don't have a playlist currently loaded you are given an empty pane to create/edit one. See the Playlist control panel below.
- Copy music: if you select this then all of the actual music files corresponding to the items in the playlist will be copied to a new folder in your My Playlists folder. This would be useful if you wanted to fill a memory–stick using a playlist as a template.
The Control panel
Back to 'Contents'

The control panel has a group of buttons towards the left-hand end which may either be for Play control (shown above) or Playlist control.
On the right there is a volume control slider and a track progress bar and other track information.
You can adjust the volume either by clicking at the appropriate place on the slider bar or by pressing the ‹ to reduce the volume or the › to increase the volume.
Similarly you can jump to wherever you like while playing a track by clicking on the track progress bar at the appropriate place.
Below the control panel is a status bar with two fields. The left-hand one tells you the number of tracks and albums which are in the current genre and the right-hand one tells you if track logging is enabled or not.
The next two sections discus the buttons at the left.
The Play control panel
The play control buttons are standard buttons; play, stop, pause, backwards and forwards. The backwards and forwards buttons take you to the previous and next tracks if any. If you are on the first track backwards does nothing and similarly if you are on the last track forwards does nothing. Except: if you have the repeat checkbox checked: in this case forwards from the last track cycles back to the first track and vice–versa.
Under these buttons are two check boxes:
- Repeat: if this is ticked then the current album or playlist will play again and again until you stop it with the stop button. If it is not ticked then the music player falls silent at the end of the last track.
- Shuffle: if this is ticked then tracks from the current album or playlist will play in a pseudo–random order.
The Playlist control panel
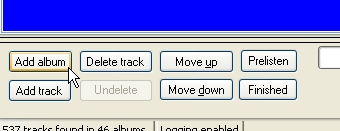
There are eight buttons in this group and they appear whenever you are creating or editing a playlist:
- Add album: the album highlighted in the genres window pane will be added to the playlist. You can also do this by double clicking on an album.
- Add track: while you are creating a playlist you can swap to the Playing now tab; from here you can select a track and then, by clicking Add track you can add just that single track to your list. You can also do this by double clicking on the track.
- Delete track: if you change your mind about a track and want to delete it from the playlist then simply select it in the playlist and click the Delete button.
- Undelete: you only get one chance at this – if you delete a track inadvertently then the Undelete button will restore it. NOTE. All that this button does is remember the last track to be deleted.
- Move up: if you want to arrange the tracks in your playlist manually, select a track and then you can move it up the list by clicking the Move up button.
- Move down: if you want to arrange the tracks in your playlist manually, select a track and then you can move it down the list by clicking the Move down button.
- Prelisten: if you are not sure about a track which you have added to a playlist, select the track and click the Prelisten button to pre
viewlisten to it. While it is being played the Prelisten button turns into a Stop button - to stop listening to it of course. Use the volume control to adjust the prelisten sound level, if you need to, in the same way as you would when listening to albums. Also you will find that the track progress bar and track information will be displayed in the same way as when playing albums.
- Finished: when you are happy with the playlist click the Finished button. This will change the Playlist control panel buttons back to the Play control panel buttons. A message will also pop up reminding you to save your new playlist.
Playlists are stored in a folder called My Playlists which is in the My Documents\My MediaPlayer Items folder; they are stored in plain text. and are simply a list of the filenames, complete with path, of the tracks you want to play. So, you can edit them with notepad or whatever to combine other playlists or whatever you need.
For example here is a fragment of my Classical.pl
        J:\My Music\MG-Classical\I Madrigalisti di Roma - directed by Domenico Cieri\I Madrigalisti di Roma\14 Gaude mater Polonie.wma

J:\My Music\MG-Classical\I Madrigalisti di Roma - directed by Domenico Cieri\I Madrigalisti di Roma\15 Exsultate justi in domenico.wma

J:\My Music\MG-Classical\I Madrigalisti di Roma - directed by Domenico Cieri\I Madrigalisti di Roma\16 Lasciaterrai morire.wma

J:\My Music\MG-Classical\I Madrigalisti di Roma - directed by Domenico Cieri\I Madrigalisti di Roma\17 Track 17.wma

J:\My Music\MG-Classical\Ludwig van Beethoven\The Essential Beethoven CD1\06 Fur Elise.wma

J:\My Music\MG-Classical\Ludwig van Beethoven\The Essential Beethoven CD2\04 Romance No.2 in F major, Op.50.wma

J:\My Music\MG-Classical\Pachelbel, Bach, Albinoni etc\Pachelbel's cannon - Albinoni's adagio - etc\01 Pachelbels' cannon.wma

J:\My Music\MG-Classical\Pachelbel, Bach, Albinoni etc\Pachelbel's cannon - Albinoni's adagio - etc\06 Albinoni's Adagio.wma
Track logging
Back to 'Contents'
If you click the track logging part of the status bar you will notice that it toggles the state of track logging between enabled and disabled.
When track logging is enabled a log file is created. A new log file is created each day that track logging is enabled which contains a record for each track that you play together with the time that the track started playing and the time that it ended or was stopped, paused or unpaused. You can view this by either right clicking and selecting View Log or by simply pressing Ctrl-L.
Click here to return to where you were.
Note. Where ever you see this symbolhover you mouse pointer over it to get more information.
